Azure Data Factory How To’s: How to Get Azure Data Factory to Loop Through Delimited Text or Excel Files in a Folder

A person in a light-colored sweater types on a laptop keyboard at a desk, with a notebook and pencil nearby, possibly working on an Azure project.

Table of Contents

Rachel 2022 150x150 1


By Rachel Mantei, Dynamics 365 Technical Consultant


Situation

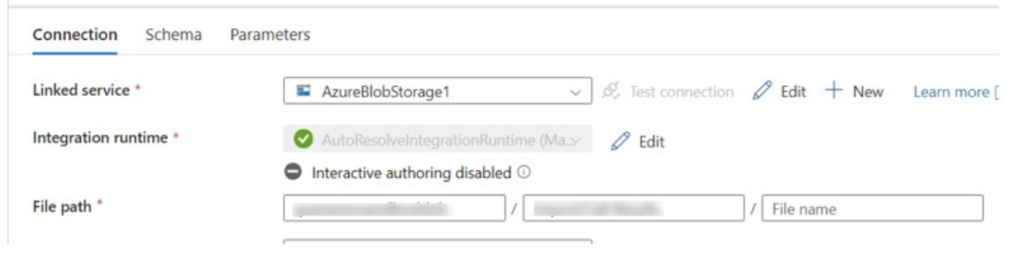
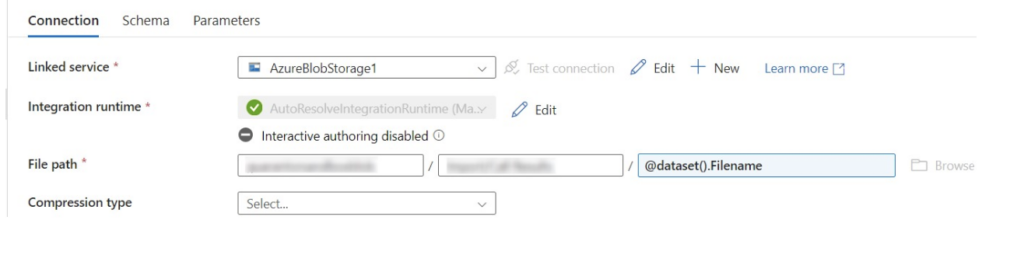
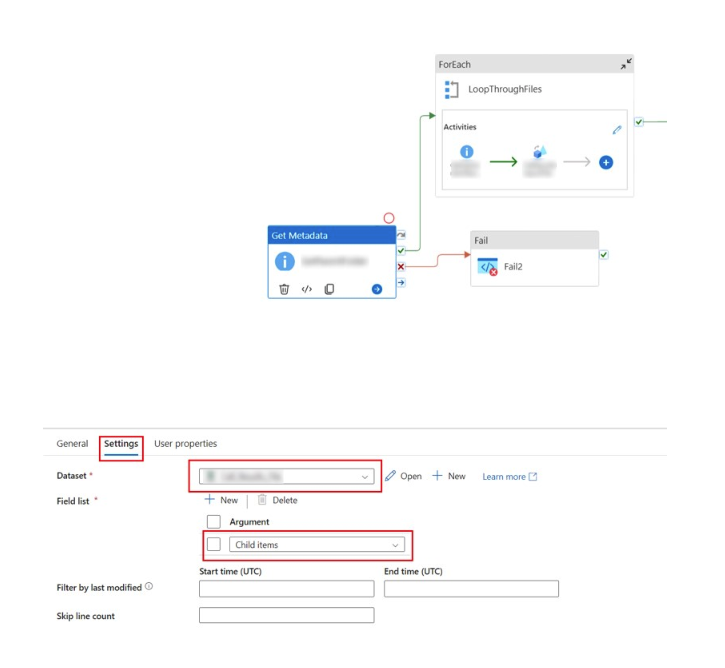
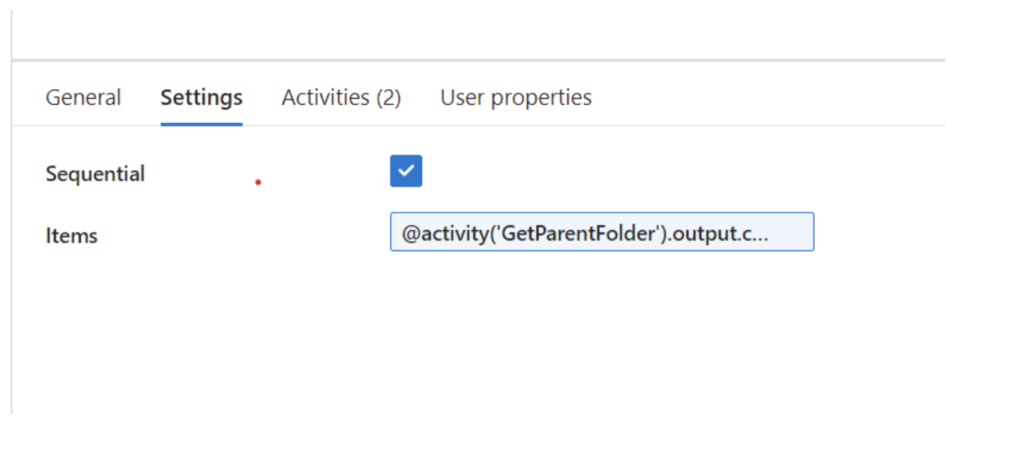
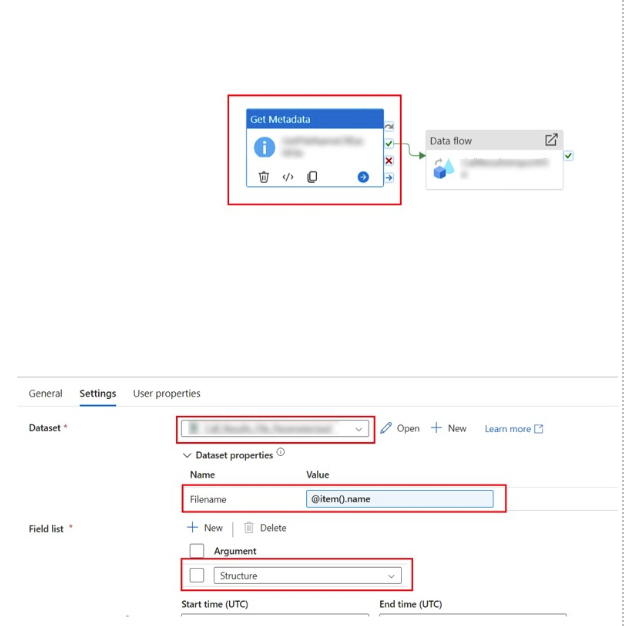
I decided to write this blog post after encountering multiple situations where there was a need to extract, transform and load multiple files from a folder as a Source into Dynamics 365. In one particular case, our client had multiple flat files that were dropped into a blob storage daily that needed to be transformed sequentially and loaded into their Dynamics environment. 

Solution

1. You will need to create two Datasets called from the same folder. One to be used to grab the parent folder, the other to grab the specific file structure within the folder. 

2. The first dataset will be the file path to the folder that holds all the files (see photo 1) 

3. In the second dataset, select the parameters tab and enter a parameter name that is unique. My example was, “Filename”. This parameter will be used to dynamically update the file source within the data flow to be ran as the pipeline loops through all the files in the folder. (see photo 2) 

4. While in the second dataset, enter the same file path as the first dataset but for the file name you will enter, “@dataset().[parameter]”. For my example, the file name is “dataset().Filename” (see photo 3). 

Screenshot of an Azure connection setup interface showing fields for linked service, integration runtime, and file path, with dropdown menus, buttons, and grayed-out text for sensitive information.

Photo 1

Screenshot of a user interface in Azure showing a Parameters tab selected, with fields for Name, Type, and Default value. An entry for Filename as a string type is visible. Options for New and Delete are at the top.

Photo 2

Screenshot of a data connection setup in Azure with fields for Linked service, Integration runtime, File path, and Compression type. AzureBlobStorage1 is selected, and Interactive authoring is disabled.

Photo 3

5. Next, you will create your pipeline. 

6. Add a “GetMetadata” activity. 

7. Within the “GetMetadata” activity, select the settings tab. 

8. For the dataset you will select the dataset that contains just the folder path (see dataset from photo 1). 

9. The field list will need to be set to “Child Items”. 

  • This will grab all the child items from within the folder path and will return each item when you run the pipeline (see photo 4). 
Screenshot of an Azure data processing workflow, featuring a ForEach loop, Get Metadata, and Fail activity. The Settings tab below displays options to set Dataset, Field list to “Child items,” and time-based filters.

Photo 4

10. Next, you will need to create a ForEach activity. 

  • Be sure to connect ON SUCCESS the first “GetMetadata” activity to the ForEach activity. 

11. Under the ForEach activity, select the Settings tab (see photo 5) 

azure

Photo 5 

12. To run each item in the folder sequentially, you will need to select the “Sequential” field and hit the box to check yes (see photo 5). 

13. Under the “Items” box, you will need to enter the first “GetMetadata” activity output. 

  • For my example, the first “GetMetadata” activity is named “GetParentFolder”. So you will need to pass the name of the Get Metadata step into the parenthesis: “@activity(‘GetParentFolder’).output.childItems” 

14. Select to edit the ForEach activity by clicking on the pencil icon in the top right of the ForEach activity. 

15. Within the ForEach activity, add another “GetMetadata” activity. 

16. For the second GetMetadata activity Dataset, choose the parameterized data set (see dataset from photo 3). 

17. You will need to populate a value within the [parameter] that is getting passed through to the activity step. In my case the parameter is named, “Filename”. You will need to enter the value “item().name” to get the name of the file that will be passed as the file source within the data flow (see photo 6). 

18. Under the field list option, select “Structure” to provide the actual data structure for delimited text and Excel format datasets (see photo 6). 

  • Additional Notes: 
    • From there, you can run the data flow on success of grabbing the metadata for each file. The second getmetadata step will pull each file from the folder and run the files sequentially as the data source for the dataflow. 
    • You can exit the ForEach activity to add fails or to move the file into another folder after processing. 
Screenshot of a data pipeline in Azure showing a Get Metadata activity linked to a data flow. Settings include mapping the Filename argument to @item().name and options for start and end time in UTC.

Photo 6

Contact Us

If you have other scenarios where this feature might help, or if you would like to discuss how we may be able assist you with a similar situation, feel free to reach out and let us know. The team at New Dynamic is always interested in hearing about and helping create success stories using Microsoft products. 

Join the Community

If you found this blog helpful, subscribe to receive our monthly updates.

Table of Contents

Share with your network

What our Customers Say