


Microsoft Power Apps Portal Pages How To – Display an Entity List using FetchXML and Liquid Code for a more custom Portal Page

Close-up of a person’s hands typing on a laptop keyboard, possibly managing CRM tasks in Microsoft D365, with a spiral notebook open nearby on a wooden desk. The person is wearing a watch and a thin ring on one finger.

Table of Contents

A middle-aged man with short dark hair smiles at the camera in front of a dark, out-of-focus background with partial red and white text. He is wearing a light-colored collared shirt, ready to discuss Dynamics 365 Customer Engagement solutions.
By Rachel Mantei, Dynamics 365 Technical Consultant

2025 Update: This blog was written Power Apps Portal Pages was renamed Power Pages. 

Rachel Mantei here with part 1 of 4 of my Microsoft Power Apps Portal Pages How To Series. Part 1 of this series looks at how to display an Entity List using FetchXML and Liquid Code for a more custom Portal Page.

Sometimes, the out of the box way for styling entity lists is not the prettiest. The following steps show you how to style your data from CRM to build out a more custom portal with HTML and CSS.

Building your FetchXml query within CRM

  1. First, you will want to create your Fetchxml query.

NOTE: You can use the Fetchxml builder through XRM Toolbox, or through the advanced find in D365 CRM

  • You can find the advanced find by clicking the gear icon in the top right navigation of your CRM environment. Select Advanced Settings.
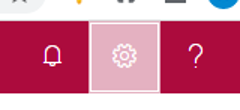
           

Three red square buttons: a bell icon for notifications, a gear icon for settings (highlighted), and a question mark for help—ideal for Microsoft D365 or Power Platform consulting dashboards.

Photo 1

  • In the new window, navigate again to the top right of your navigation and select the funnel icon
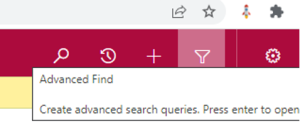
A computer screen displays a toolbar with search, refresh, plus, and filter icons in Microsoft D365. A tooltip labeled Advanced Find is visible, with text: Create advanced search queries. Press enter to open.

Photo 2

  • Once selected, a new window will appear.
  • From there, you will select the table and add the attribute columns you want displayed on the portal. You can choose the attribute columns by selecting, “Edit columns”.
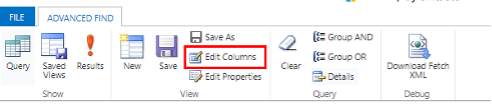
A software toolbar in Microsoft D365 CRM displays options like Query, Saved Views, Results, Save, Edit Columns (highlighted in red), Edit Properties, Group AND/OR, Clear, Details, and Download Fetch XML.

Photo 3

  • Within the next window, select the columns you want to bring in the portal by selecting, “Add Columns”.
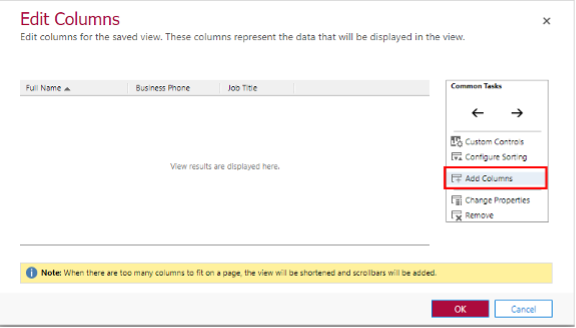
A software interface titled Edit Columns in Microsoft D365 shows selected columns: Full Name, Business Phone, and Job Title. The Add Columns option is highlighted, while a yellow note—common in CRM solutions—warns about adding too many columns.

Photo 4

  • After you select all your columns, select “OK”.
  • Next, navigate to the top bar of the advanced find window. Select, “Download Fetch XML”.

A screenshot of the Microsoft D365 Advanced Find toolbar, highlighting the Download Fetch XML button with a red box. Other CRM options like Save As, Edit Columns, and Clear are also visible.

Photo 5

  • After a few seconds, the file will show up at the bottom of the advanced find screen. Open the file.
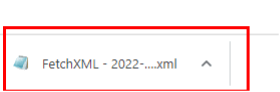
A file named FetchXML - 2022-....xml appears at the bottom of a screen, highlighted by a red rectangle, indicating it has been downloaded—ideal for Dynamics 365 Customer Engagement or Power Platform consulting scenarios.

Photo 6

Building the layout from the data returned by the FetchXml query

  1. In your preferred code editor, add the fetchxml.
  • Surround the fetchxml by placing the following liquid tags in your editor:
  • {% fetchxml enterANameHere %} – before the fetchxml
  • {% endfetchxml %} – after the fetchxml
  • You will be able to pull all the records that meet your fetchxml criteria.

NOTE: Filtering example can be found in Photo 8

See below for iterating through the records with simple html below. You will need to keep the defining ‘result’ from the Example.results.entities fetchxml and ensure the ‘result.’ is before the schema names within the div tags.
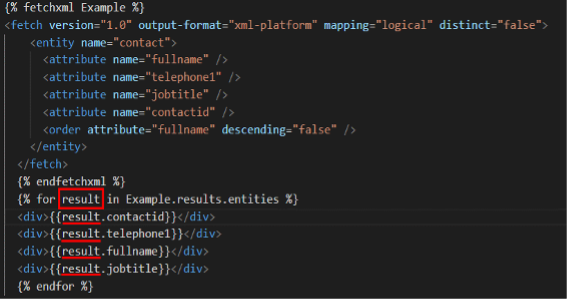
Screenshot of code demonstrating FetchXML with a for loop in a templating language, highlighting several instances of the term “result” in red within the loop that outputs Microsoft D365 contact information fields.

Photo 7

From here, you will be able to view the results on your portal page.

If you have a link entity, you will need to bring in the linked entity fetchxml within the fetch. Based off the alias name, you will need to bring the result in by coding:

{{result[‘alias name’.schema name’]}}

See example below:
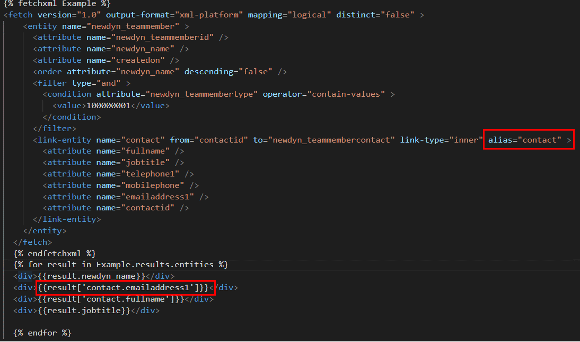
Screenshot of XML code in a code editor, displaying a Dynamics 365 Customer Engagement fetchxml query for contact data. Sections like alias=contact and emailaddress1 are highlighted in red.

Photo 8

With this information, you will be able to design bootstrap cards, grid tables or any other custom HTML you will want to bring into your portal.

Let us know what scenarios this feature would help you with; we are always excited to hear from our clients and their success stories using Microsoft products.

Note: This blog was written before Power Apps Portal Pages was renamed to Power Pages.

Join the Community

If you found this blog helpful, subscribe below to receive our monthly updates.

Author

Join the Community

If you found this blog helpful, subscribe to receive our monthly updates.

Table of Contents
Share with your network

What our Customers Say